Building a Heroku-like infrastructure for $5 a month
One of my goals for this year is to experiment with my ideas and see which ones will work and which won’t. But to do that I first have to be able to create new projects or make changes to the current ones and deploy them easily. So far, my favorite tool for deploying web apps has been Heroku thanks to its simplicity. But when you have many apps (possibly with many processes) it gets expensive. So I decided to build my own infrastructure similar to Heroku that would run on a single cheap server.
In the past, I have been experimenting with many different tools for running and deploying web apps. On the one hand, it was good since I learned a lot and now I know which tools work for me and which do not. On the other hand, it's a mess. Now, each of my projects uses different tools and each project is deployed at a different place. When I want to update a project, there is a huge mental barrier because I have to think about how to run it in development and after I make some changes how to build it and deploy it. Oftentimes, when I want to do a small change or fix, I simply don't do it since it's too much effort. So my main goal now is to have a simple and unified interface across all my projects: one command for running a dev version of the app and one for deploying it.
After many trials and errors, I ended up with an architecture that I am really satisfied with and have been using it for a while for hosting many different projects. So in this post, I will show you how to do all that using Docker Compose, GitLab CI, and a VPS for $5 a month.
“How much can I save with this?” you ask. Let's say you want to host 5 apps/processes, as I do. If you hosted it in on Heroku, you would pay 5 times $7 per month, that is $35 a month. With a single VPS, you would pay just $5 a month. But of course, the number of apps you can fit to the server depends on how much memory they need and how much traffic you have. But you can always get a larger instance.
First, I will go through all the requirements that I have for the infrastructure. Then, I will briefly describe the end result and finally, I will go step by step through the setup. The post is quite long so better make some coffee before diving in. Enjoy!
Table of contents
TL;DR
If you don't have time to read the whole article (or don't need to know all the details) and just want to set it up as fast as possible, I prepared a guide (both video and text) and a template that helps you to get it up and running in less than 15 minutes. With this bundle you will get
- a video tutorial guiding you through all the steps from creating an Amazon Lightsail account to deploying your first app in less than 15 minutes,
- all code needed to set up the infrastructure with one
git push, - and a cookiecutter template for generating all the boilerplate code (
Dockerfile,docker-compose.yml,.gitlab-ci.yml, etc.) for running and deploying new projects.
Requirements
First, let's go through all the requirements that we have for the final infrastructure:
- Simple and consistent interface across all projects. What I like about Heroku is that you just run
heroku localto run the dev/local version in debug mode andgit push heroku masterto deploy it. - Consistent development and production environments. If you make it work locally, it will work in production as well. “If it works on your machine, then we will ship your machine.”
- Continuous deployment. Build, test, and deploy the app with each
git push. - Zero downtime deployments. Since I want to deploy the apps continuously, it needs to be able to deploy them without any downtime.
- Support for various kinds of apps and websites: dynamic web apps (e.g. Flask) with optional cron jobs, static websites (plain HTML) that can be built with a static website generator, a combination of both, ETL jobs, etc.
- All configuration should be documented, versioned, and ideally automated. I always forget how I set up a server or run a certain service so everything has to be documented so that it's repeatable. Ideally, it should be documented in a machine-readable format (YAML, bash script, whatever) so that it can be easily rerun automatically by a machine in a CD pipeline. All this should lead to 100% reproducibility (e.g. on a new server). This applies both to server's and services' configurations.
- All configuration of the server and services should be done via CD pipeline so that you never forget to put it to Git. If you don't put it to Git, it won't run.
- Ability to issue and renew SSL certificates automatically for all domains.
- The whole setup should feel "serverless". I don't want to bother (too much) with manually setting up servers, copying config files there, maintaining some services, etc. Also the apps themselves should not be aware of the underlying server they will be deployed to. The server's should be easily disposable and replaceable. It should work kinda like AWS ECS (you still have to provision an instance but don't have to care about it).
- Some kind of environment variable manager so that I don't have to SSH to the server and set the environment variables manually each time I set up a new server or an app. The same way Heroku does it.
- Ability to do fast rollbacks.
- Ability to run one-off/administrative tasks easily, similarly to
heroku run. - Seamless integration with my IDE of choice, PyCharm.
Infrastructure overview
The diagram below shows the overall architecture I came up with and how all the parts fit together. The most important part is the VPS running a Docker daemon that manages all containers running on that server.
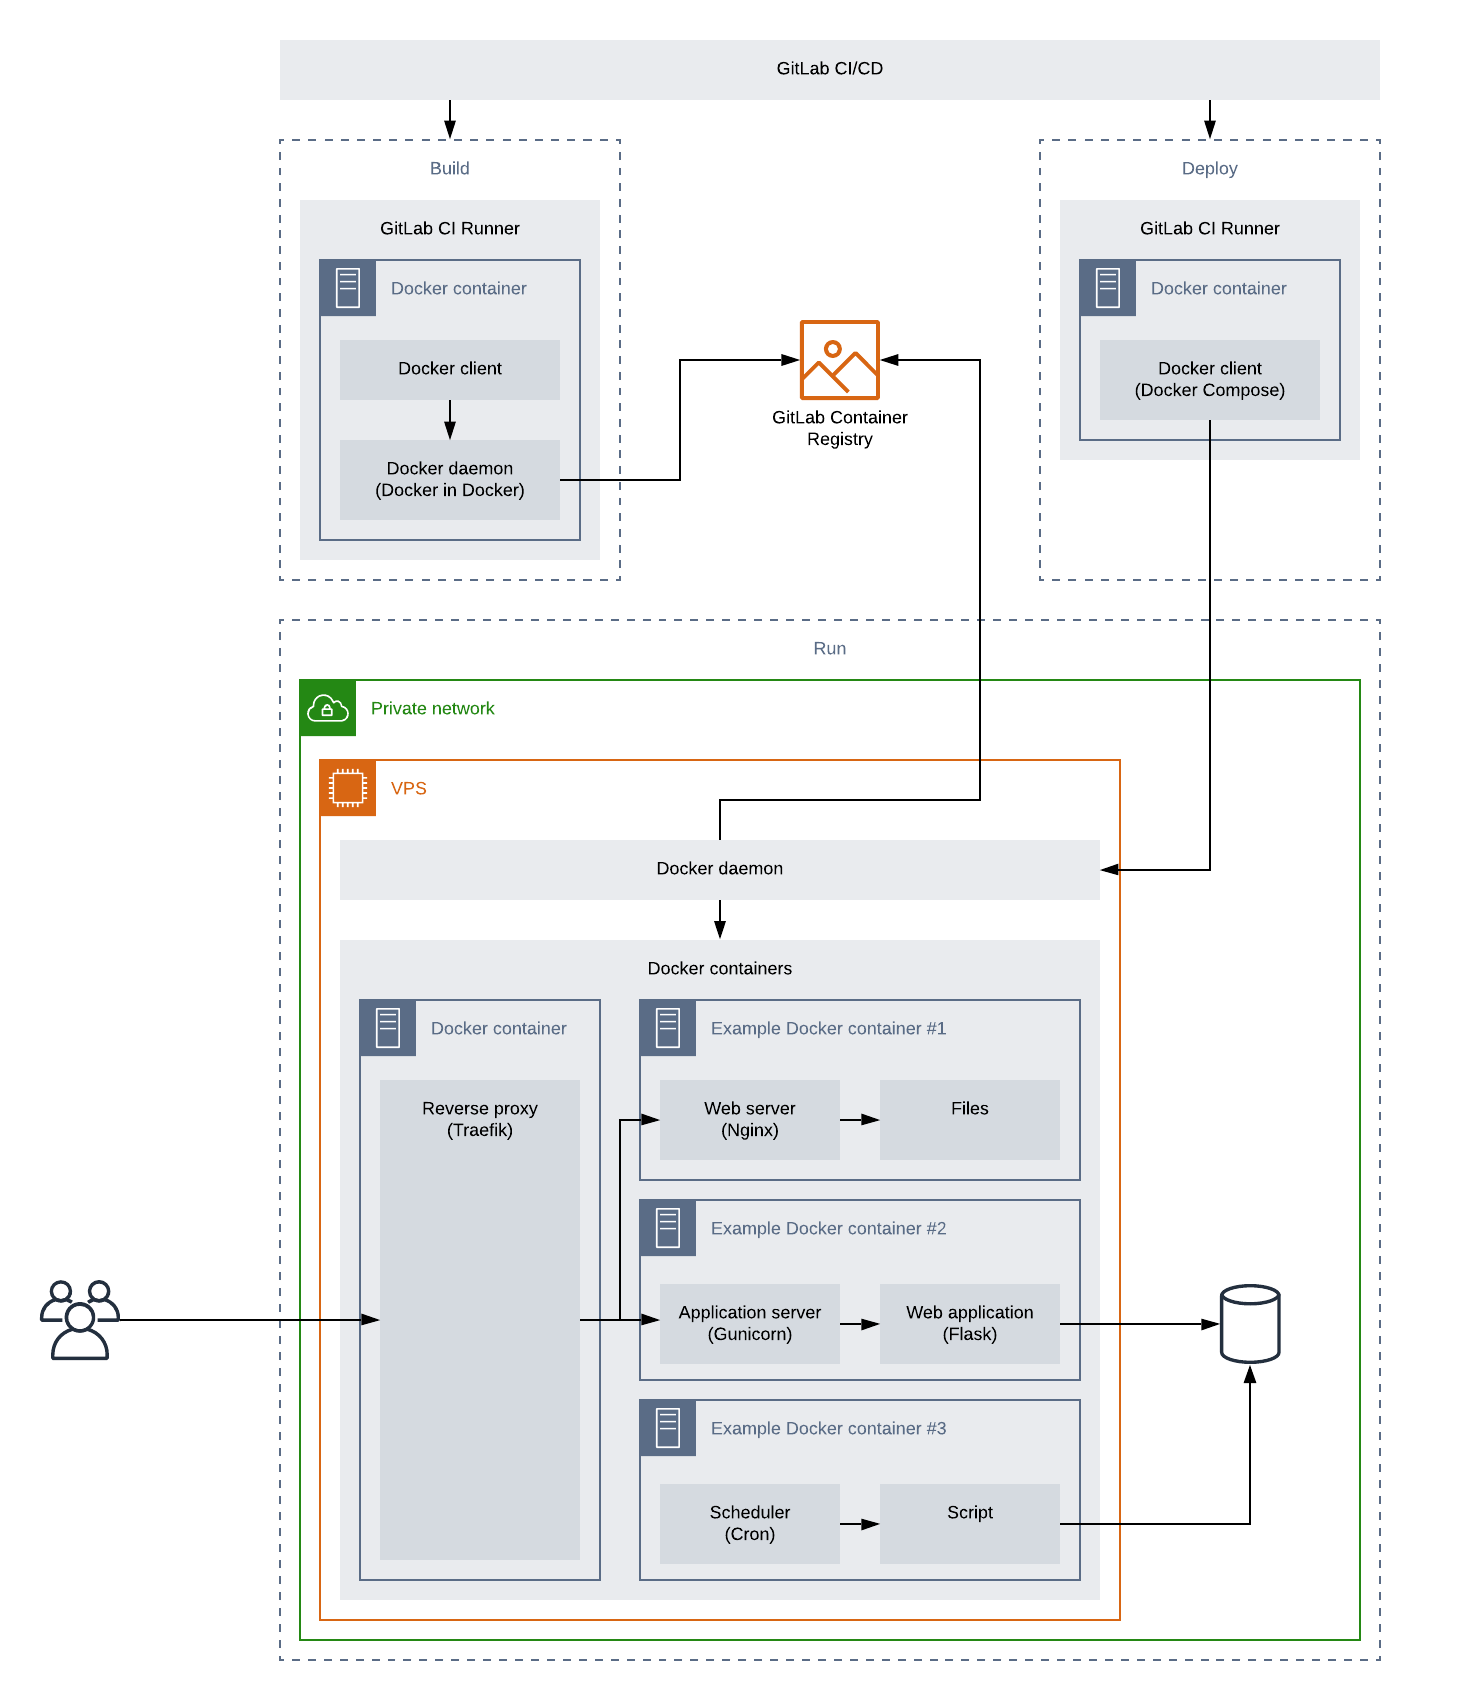
In order for us to be able to run multiple web apps and websites on the same server, we need a reverse proxy that will forward each request to the right container. The proxy is the only contact point with the outside world (Internet), besides SSH, and forwards all HTTP requests to other containers running in the Docker network. I am using Traefik since it is able to auto-discover all containers that are exposing some port and start passing traffic to them as soon as they are running. In order for it to know which requests to forward to which container, each web container needs to expose a port (e.g. 80 by Nginx and 5000 by Gunicorn) and add container labels to itself telling which requests it is able to handle (e.g. all HTTP request for a given hostname). So for example, a Docker container can expose port 5000 and say it's handling requests for www.example.com and Traefik will automatically forward all HTTP requests for www.example.com to this container's port 5000. If there are more containers accepting a given request, it will do load balancing out of the box.
The rest of the containers are actual application containers. Those can be any containers but in my case I have two main types of containers:
-
Web and app servers exposing some port (i.e. they can be accessed from within the Docker network but not from outside) that will be discovered by Traefik.
- Containers running a webserver. For each static website hosted on the VPS, there is one container running Nginx and serving static files built into the image.
- Containers running app servers. In each of these containers, there is Gunicorn running and passing requests to a Flask app. Optionally, there can be Nginx running as well which will serve static files for this app or passing requests to Gunicorn (if you don't want Gunicorn serving static files).
-
Other containers that are not exposing any port (e.g. a container running cron jobs) will be ignored by Traefik (since they cannot be accessed even from the Docker network).
- Containers running Cron in the foreground. If an app needs to run some scheduled tasks, it runs a separate Docker container with cron running in the foreground and running the tasks. The cron containers are split from the app containers so that each container runs only one process. This is important because it will get restarted by Docker automatically if the cron process fails for some reason.
Each container has it's own repo on GitLab with the code itself and files telling Docker how to build it and GitLab CI how to deploy it. As I said, the code gets deployed each time it's pushed to GitLab so let's look into what happens when you run git push origin master.
When the code get's pushed, GitLab CI runs a Docker container for each stage of the CI pipeline. In the first, build, stage, we build a Docker image and push it to a registry. In the next, optional, stage, we can test the image. And in the final, deploy, stage, we connect to our VPS over SSH and deploy it.
The containers are orchestrated (started/stopped) via Docker Compose which runs on a GitLab CI Runner and connects to the Docker daemon running on the VPS over SSH.
You can also see that the VPS is used only for running stateless containers so it's using a managed database.
The whole setup is quite modular/decoupled so most of the boxes you see there can be replaced with something else. For example, if you want to distribute your services over multiple machines, you can use Docker Swarm or Kubernetes instead of Docker Compose. And if you don't want to bother with provisioning servers at all, you can use AWS Fargate with AWS ECS or EKS. Or you can replace GitLab CI with GitHub Actions. Or you can use a different reverse proxy. In either case, the principles should stay the same.
Steps
- Set up an SSH key pair for GitLab CI and add the public key to our server so that jobs running on GitLab CI can SSH to the server and deploy the code.
- Provision a server and install Docker.
- Add a reverse proxy to our server to route all the traffic to the right apps.
- Dockerize our apps/websites and deploy them using GitLab CI.
Setting up GitLab CI/CD
In order to build and deploy our code on each push, we need some CI server. Since I am using GitLab to host all my code, I will be using GitLab CI/CD.
I recommend putting all your code into a GitLab group. This way you can share some variables (e.g. SSH key) among all the projects and don't have to add it for each project separately.
First, we need to generate a new SSH key pair for the CI server (GitLab CI runners) so that it can SSH to our server and deploy the code. Do not add a passphrase to the SSH key.
ssh-keygen -t ed25519 -C "GitLab"
Now we need to add the private key to a variable named SSH_PRIVATE_KEY to GitLab group's CI variables.
In the next step, we will set up a server and add the public key to its authorized keys.
Setting up a server
First, we need to provision a virtual private server (VPS). In my case, I provisioned it on AWS Lightsail but you can use any other provider such as DigitalOcean or AWS EC2, it does not matter. After that, provision a static IP address and attach it to the server. If you are using AWS Lightsail, do not forget to allow port 443 in the networking tab (since it's blocked by default and it took me some time to figure that out).
Now we need to add the CI server's public key (that we generated in previous section) to our server's ~/.ssh/authorized_keys so that it can SSH to it:
ssh-copy-id -f -i ~/.ssh/gitlab.pub USER@HOST
Then we will add our server's public key to CI server's known hosts so that it does not complain when it connects to it for the first time:
ssh-keyscan HOST | pbcopy
And add the output to a variable named SSH_KNOWN_HOSTS to your GitLab group's variables.
For convenience, let's also add a variable called SERVER_HOSTNAME with the domain name or IP address of your server to GitLab group's variables so that you don't have to hard code it in our deploy scripts.
Since we will need Docker on our server, which is not installed by default, we need to install it. In order to keep track of the commands and scripts we run on the server (and so that we can easily apply them if we set up a new server), we will put all the scripts in a versioned repository and put it to GitLab.
mkdir infra && cd infra && git init
Now, create a file named setup-server.sh and put all the code for setting up the server there:
set -eux

sudo apt-get update

# Firewall
sudo ufw allow OpenSSH
sudo ufw allow http
sudo ufw allow https
yes | sudo ufw enable

# Install Docker (https://docs.docker.com/engine/install/ubuntu/)
sudo DEBIAN_FRONTEND=noninteractive apt-get -y install \
  apt-transport-https \
  ca-certificates \
  curl \
  gnupg-agent \
  software-properties-common
curl -fsSL https://download.docker.com/linux/ubuntu/gpg | sudo apt-key add -
sudo add-apt-repository "deb [arch=amd64] https://download.docker.com/linux/ubuntu $(lsb_release -cs) stable"
sudo apt-get update
sudo apt-get install -y docker-ce docker-ce-cli containerd.io

sudo groupadd -f docker
sudo usermod -aG docker "${USER}"

# Increase the default number of sessions per SSH connection, see https://github.com/docker/compose/issues/6463
sudo sed -i -r 's/#?MaxSessions.*/MaxSessions 100/' /etc/ssh/sshd_config
sudo systemctl restart ssh
As I said in the beginning, I don't want to mess around with setting up any servers manually so let GitLab do the hard work. We need to tell GitLab what to do by creating .gitlab-ci.yml file:
setup:
  stage: deploy
  image: docker/compose:debian-1.25.5
  before_script:
    # See https://docs.gitlab.com/ee/ci/ssh_keys/#ssh-keys-when-using-the-docker-executor

    ##
    ## Install ssh-agent if not already installed.
    ## (change apt-get to yum if you use an RPM-based image)
    ##
    - 'which ssh-agent || (apt-get update -y && apt-get install openssh-client -y)'

    ##
    ## Run ssh-agent (inside the build environment)
    ##
    - eval $(ssh-agent -s)

    ##
    ## Add the SSH key stored in SSH_PRIVATE_KEY variable to the agent store
    ## We're using tr to fix line endings which makes ed25519 keys work
    ## without extra base64 encoding.
    ## https://gitlab.com/gitlab-examples/ssh-private-key/issues/1#note_48526556
    ##
    - cat "$SSH_PRIVATE_KEY" | tr -d '\r' | ssh-add -

    ##
    ## Create the SSH directory and give it the right permissions
    ##
    - mkdir -p ~/.ssh
    - chmod 700 ~/.ssh

    # See https://docs.gitlab.com/ee/ci/ssh_keys/#verifying-the-ssh-host-keys
    ##
    ## Assuming you created the SSH_KNOWN_HOSTS variable, uncomment the
    ## following two lines.
    ##
    - echo "$SSH_KNOWN_HOSTS" >> ~/.ssh/known_hosts
    - chmod 644 ~/.ssh/known_hosts

  script:
    - ssh ubuntu@$SERVER_HOSTNAME < setup-server.sh
We define a setup job that runs in a default deploy stage and inside a Docker container based on docker/compose:debian-1.25.5 image. In the before_script section we make sure that ssh-agent is installed and running, add the private key to it and add our server to known hosts (the before script is copy & pasted from GitLab CI/CD SSH keys reference). Then, in the script section, we run the setup-server.sh script on our server over SSH. Note that the script should be idempotent because it will be run each time the code is pushed to the repo.
(You can read more about .gitlab-ci.yml and its syntax in GitLab CI/CD pipeline configuration reference.)
Finally, push the code to the repo and the server should set up automatically. You can check it by connecting to it and running docker.
Setting up a reverse proxy
Since we will use the server to host multiple different web apps we need a reverse proxy that will forward all HTTP requests to the right app based on a hostname or other rules. It will be the only contact point with the Internet. It will be also responsible for handling SSL certificates via Let's Encrypt.
We will be using Traefik instead of Nginx, which is often used, because it supports auto discovery of Docker containers and load balancing out of the box. Thanks to that it's easy to set up with containerized applications and allows us to do blue/green (zero downtime) deployments.
Set up
All our apps and services will be running inside their own Docker containers and this proxy is no exception. Because I am lazy and don't want to type those super long docker run commands each time I want to run an app, let's create a docker-compose.yml file which tells Docker Compose how to run it (you can learn more about Docker Compose and docker-compose.yml in the official Docker Compose documentation):
version: "3.4"

services:
  traefik:
    image: "traefik:v2.2"
    command:
      - --entrypoints.websecure.address=:443
      - --entrypoints.web.address=:80
      - --providers.docker=true
      - --api
      - --certificatesresolvers.le.acme.email=${EMAIL}
      - --certificatesresolvers.le.acme.storage=/acme.json
      - --certificatesresolvers.le.acme.tlschallenge=true
    labels:
      # Global redirection: HTTP to HTTPS
      - traefik.http.routers.http-redirects.entrypoints=web
      - traefik.http.routers.http-redirects.rule=hostregexp(`{host:(www\.)?.+}`)
      - traefik.http.routers.http-redirects.middlewares=redirect-to-non-www-https

      # Global redirection: HTTPS www to HTTPS non-www
      - traefik.http.routers.www-redirects.entrypoints=websecure
      - traefik.http.routers.www-redirects.rule=hostregexp(`{host:(www\.).+}`)
      - traefik.http.routers.www-redirects.tls=true
      - traefik.http.routers.www-redirects.middlewares=redirect-to-non-www-https

      # Dashboard
      - traefik.http.routers.traefik.entrypoints=websecure
      - traefik.http.routers.traefik.rule=Host(`${DOMAIN}`)
      - traefik.http.routers.traefik.service=api@internal
      - traefik.http.routers.traefik.tls.certresolver=le
      - traefik.http.routers.traefik.middlewares=traefik-auth

      # Middlewares
      - traefik.http.middlewares.redirect-to-non-www-https.redirectregex.regex=^https?://(?:www\.)?(.+)
      - traefik.http.middlewares.redirect-to-non-www-https.redirectregex.replacement=https://$${1}
      - traefik.http.middlewares.redirect-to-non-www-https.redirectregex.permanent=true

      - traefik.http.middlewares.traefik-auth.basicauth.users=$ADMINS

    networks:
      - web
    ports:
      - "80:80"
      - "443:443"
    volumes:
      - "/var/run/docker.sock:/var/run/docker.sock:ro"
      - "/tmp/acme.json:/acme.json"

networks:
  web:
    external: true
We define one service (which is a Docker container), traefik, that is using traefik:v2.2 image. We pass it all configuration via CLI options and Docker container labels. First, we tell it to listen on ports 80 (HTTP) and 443 (HTTPS), use Docker as a provider (so that it is able to auto discover other Docker containers running our apps) and set up handling SSL certificates via Let's Encrypt. Then, we tell it to redirect all HTTP requests to HTTPS and all www requests (e.g. www.example.com) to non-www (e.g. example.com) and set up the Traefik dashboard and secure it with HTTP basic auth.
Then we tell Docker to use an external network called web, which we will set up in a moment, so that all containers in this network can talk to each other. Then we publish ports 80 and 443 so that they are accessible from outside of the web network. Finally, we mount Docker socket so that Traefik can talk to Docker daemon and auto discover the other containers and acme.json file where it will store all the SSL certificates.
(You can read more about setting up Traefik with Docker and Let's Encrypt in Traefik 2.0 & Docker 101 and Traefik 2 & TLS 101, respectively. For complete documentation of the Docker container labels that Traefik recognizes, see the official documentation.)
Since neither the Docker web network nor the acme.json file exists on the server, let's create it. Again, we will create setup-proxy.sh file and put all the (host) server setup code into it:
set -eux

docker network create web || true
touch /tmp/acme.json
chmod 600 /tmp/acme.json
You may have noticed that we are using EMAIL and DOMAIN env variables in the docker-compose.yml so let's put them into .env file and GitLab repo's variables. They contain your Let's Encrypt account email and Traefik dashboard's domain (e.g. proxy.yourdomain.com).
Finally, let's generate a password which you will use to log into the Traefik dashboard and replace all dollar signs with two dollar signs in the generated hash:
htpasswd -nbB admin SOME_SECURE_PASSWORD | sed 's/\$/\$\$/g'
And paste it into ADMINS variable in your .env and GitLab repo's variables.
To make sure that everything works locally, you can run sh setup-server.sh && docker-compose up.
Deploy
Now, let's append the following two lines to .gitlab-ci.yml's script section:
ssh ubuntu@$SERVER_HOSTNAME < setup-proxy.sh
DOCKER_HOST="ssh://ubuntu@$SERVER_HOSTNAME" docker-compose -p proxy up -d
Here we run setup-proxy.sh script over SSH and then we run docker-compose up -d. By setting the DOCKER_HOST env variable, we tell Docker client to connect to the Docker daemon running on our server and run the container defined in docker-compose.yml there. Also note that we use docker/compose image instead of docker:stable since we will need Docker Compose installed.
Finally, you can push the code to GitLab and wait for GitLab CI to deploy it.
You can check that it was deployed successfully by visiting the domain you put into DOMAIN variable in your browser and signing into the Traefik dashboard:
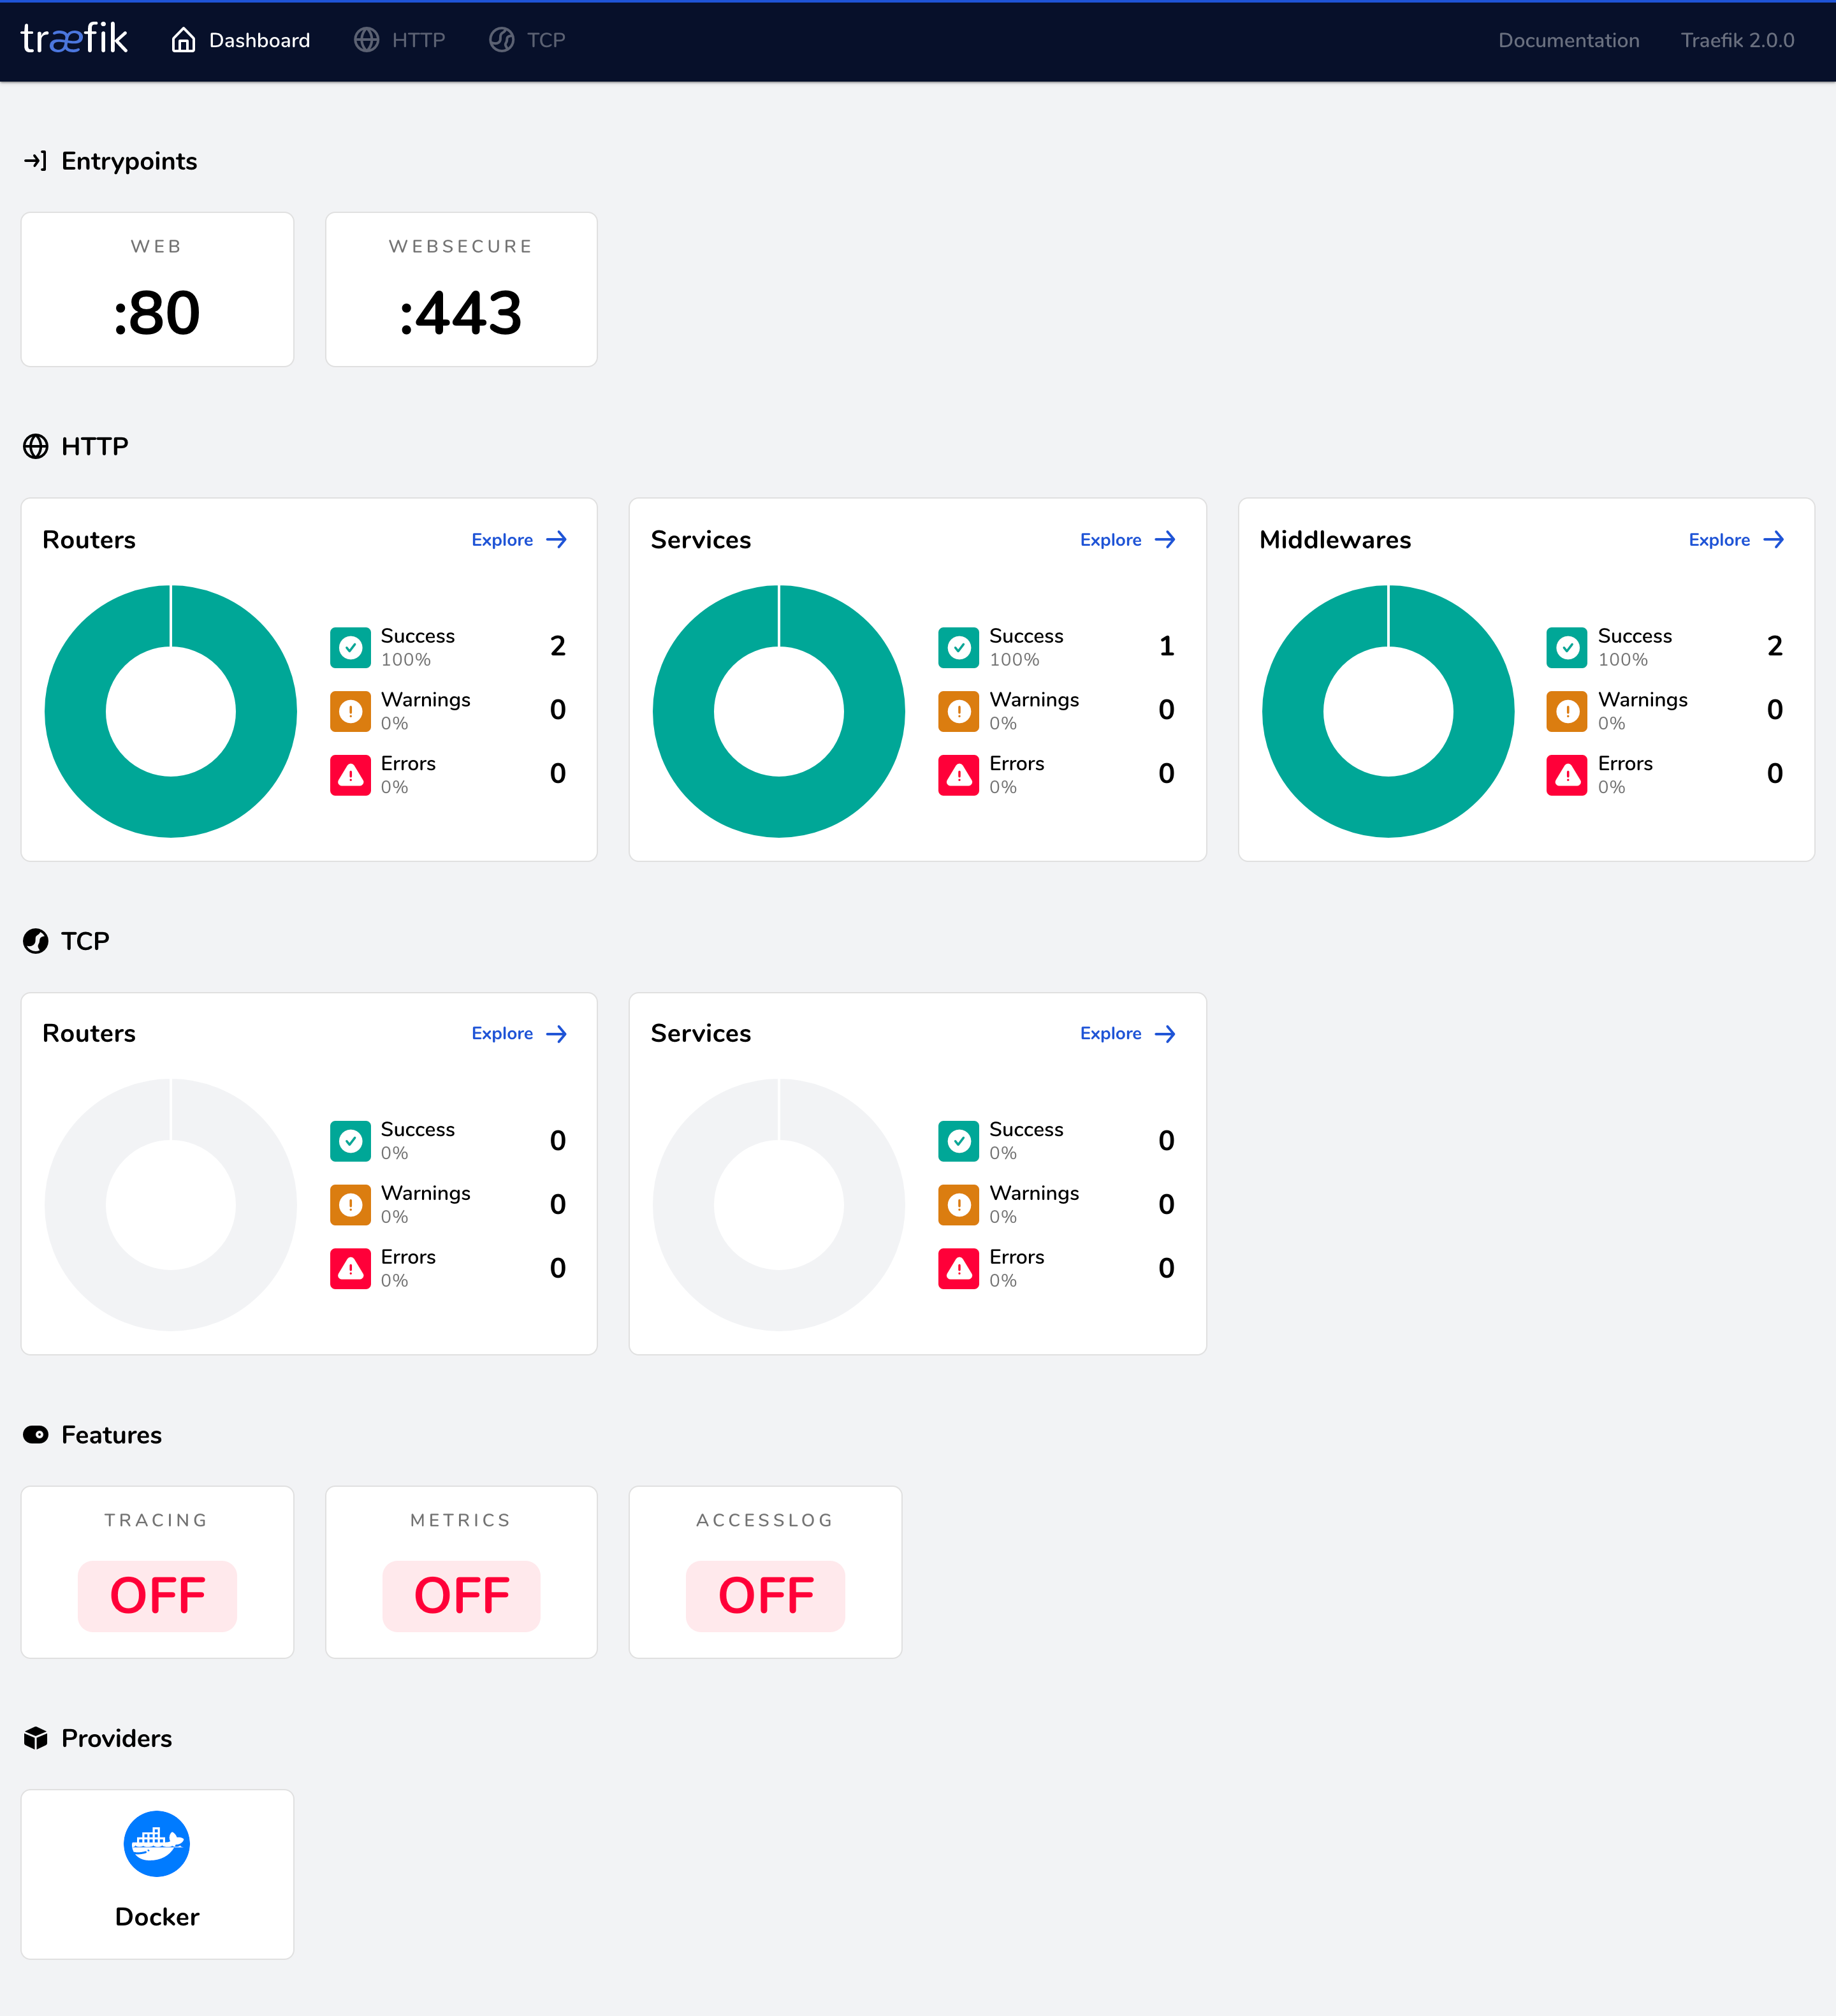
Deploying a project (static website / web app)
In this section, I will show you how to deploy a simple Flask app to the infrastructure. Even though I am using a Flask app as an example, you can use any other container as well.
Build
First we need to containerize our app. This way we create an environment in which the app runs and which will be used for both development and production. So you can be sure that if it works on your local computer it will also run in production because it will run in the same environment.

So let's create a sample Dockerfile for our Flask app:
FROM python:3.8

ARG USER_ID=1000
ARG GROUP_ID=1000
ARG USERNAME=user

RUN getent group $GROUP_ID || addgroup --gid $GROUP_ID $USERNAME
RUN id $USER_ID >/dev/null 2>&1 || adduser --disabled-password --gecos '' --uid $USER_ID --gid $GROUP_ID $USERNAME

RUN mkdir /app && chown $USER_ID:$GROUP_ID /app
RUN mkdir /venv && chown $USER_ID:$GROUP_ID /venv

USER $USER_ID:$GROUP_ID

WORKDIR /app

ENV PYTHONDONTWRITEBYTECODE=1 \
    PYTHONUNBUFFERED=1 \
    POETRY_VERSION=1.0.5 \
    POETRY_VIRTUALENVS_CREATE=false

RUN curl -sSL https://raw.githubusercontent.com/python-poetry/poetry/master/get-poetry.py | python

ENV VIRTUAL_ENV=/venv
RUN python -m venv $VIRTUAL_ENV
ENV PATH="/home/$USERNAME/.poetry/bin:$VIRTUAL_ENV/bin:$PATH"

ARG PYTHON_ENV=production
ENV FLASK_ENV=${PYTHON_ENV}

COPY --chown=$USER_ID:$GROUP_ID pyproject.toml poetry.lock ./

RUN poetry install --no-root $(if [ "$PYTHON_ENV" != 'development' ]; then echo '--no-dev'; fi)

COPY --chown=$USER_ID:$GROUP_ID . /app

CMD ["bash"]
Optionally, add .dockerignore to reduce the size of the final image.
.env
.git

*.md
!README.md

docker-compose.yml
docker-compose.override.yml
docker-compose.prod.yml
Now we have to tell Docker how to build and run our app. As usually, we will use docker-compose.yml:
version: "3.4"

services:
  app:
    build: .
    restart: unless-stopped
    environment:
      - FLASK_APP=app:app
      - SECRET_KEY
    command: ["sh", "-c", "gunicorn -b 0.0.0.0:5000 --access-logfile - --worker-class gevent $$FLASK_APP"]
    expose:
      - 5000
Usually, we want to run the app slighly differently in development and production. Docker Compose allows us to do that by overriding options in the base docker-compose.yml for each environment. In fact, when you run docker-compose up it automatically loads both docker-compose.yml and docker-compose.override.yml (if it exists). Let's create docker-compose.override.yml which will tell Docker how to run the app in development:
version: "3.4"

services:
  app:
    build:
      context: .
      args:
        PYTHON_ENV: development
    environment:
      - SECRET_KEY=123
      - GUNICORN_CMD_ARGS="--reload"
    volumes:
      - .:/app
    ports:
      - "5000:5000"
You can test that it works by running docker-compose up --build. It should start Postgres and your app on port 5000.
Now, let's create docker-compose.prod.yml file which tells Docker how to run the app in production (this file is not loaded automatically so later when we run the app in production we will have to run docker-compose -f docker-compose.yml -f docker-compose.prod.yml):
version: '3.4'

services:
  app:
    image: "${CI_REGISTRY_IMAGE}/app:${IMAGE_TAG}"
    build:
      cache_from:
        - ${CI_REGISTRY_IMAGE}/app:latest
    restart: always
    labels:
      - traefik.http.routers.YOURAPPNAME.entrypoints=websecure
      - traefik.http.routers.YOURAPPNAME.rule=Host(`${DOMAIN}`)
      - traefik.http.routers.YOURAPPNAME.tls=true
      - traefik.http.routers.YOURAPPNAME.tls.certresolver=le
      # Healthchecks are necessary for the blue/green deployment to work
      - traefik.http.services.YOURAPPNAME.loadbalancer.healthcheck.path=/
      - traefik.http.services.YOURAPPNAME.loadbalancer.healthcheck.timeout=3s
      - traefik.http.services.YOURAPPNAME.loadbalancer.healthcheck.interval=4s
    networks:
      - web

networks:
  web:
    external: true
(It would make more sense to name the dev file docker-compose.dev.yml but naming it docker-compose.override.yml is more convenient because then we can just type docker-compose up instead of the long docker-compose up -f docker-compose.yml -f docker-compose.dev.yml.)
TIP: You can run docker-compose config to see the final config that will be used (after evaluating env variables defined in .env, expanding paths and applying docker-compose.override.yml).
Deploy
When deploying the app, if we just run docker-compose pull && docker-compose stop && docker-compose up the app would not be available for a while until it fully started (which can take a while for larger apps). So instead, we will use a technique called blue/green deployment to have zero downtime: we first start another instance of the same app, wait for this instance to start and only after that we will stop the old one. Again, let's create a script, called deploy.sh, that will do just that:
set -eux

BASENAME=${PWD##*/}
DOCKER_COMPOSE_CMD="${DOCKER_COMPOSE_CMD:-docker-compose -f docker-compose.yml -f docker-compose.prod.yml}"

if [ "$(docker ps -f name=${BASENAME}_blue -q)" ]
then
    NEW="green"
    OLD="blue"
else
    NEW="blue"
    OLD="green"
fi

$DOCKER_COMPOSE_CMD pull

echo "Starting ${NEW} instance"
$DOCKER_COMPOSE_CMD --project-name="${BASENAME}_${NEW}" up -d

echo "Waiting..."
sleep 5s

echo "Stopping ${OLD} instance"
$DOCKER_COMPOSE_CMD --project-name="${BASENAME}_${OLD}" down --remove-orphans
The script was taken (and edited) from the article How to do Zero Downtime Deployments of Docker Containers by Marcus Lind where you can read more about how it works.
Now we have to put it all together and tell GitLab CI how to build and deploy it. As always, let's put it into .gitlab-ci.yml:
.docker-compose-setup: &docker-compose-setup
- echo ${CI_REGISTRY_PASSWORD} | docker login -u ${CI_REGISTRY_USER} --password-stdin ${CI_REGISTRY}
- export DOCKER_COMPOSE_CMD="docker-compose -f docker-compose.yml -f docker-compose.prod.yml"

build:
  stage: build
  image: docker/compose:debian-1.25.5
  services:
    - docker:dind
  before_script:
    - *docker-compose-setup
  script:
    # Prefill the build cache which is currently empty to speed up the build
    - export IMAGE_TAG=latest
    - '$DOCKER_COMPOSE_CMD pull || true'
    - $DOCKER_COMPOSE_CMD build
    - $DOCKER_COMPOSE_CMD push
    - export IMAGE_TAG=$CI_COMMIT_SHORT_SHA
    - $DOCKER_COMPOSE_CMD build
    - $DOCKER_COMPOSE_CMD push

deploy:
  stage: deploy
  image: docker/compose:debian-1.25.5
  rules:
    - if: $CI_COMMIT_BRANCH == 'master'
  environment:
    name: production
  before_script:
    - 'which ssh-agent || (apt-get update -y && apt-get install openssh-client -y)'
    - eval $(ssh-agent -s)
    - cat "$SSH_PRIVATE_KEY" | tr -d '\r' | ssh-add -
    - mkdir -p ~/.ssh
    - chmod 700 ~/.ssh
    - echo "$SSH_KNOWN_HOSTS" >> ~/.ssh/known_hosts
    - chmod 644 ~/.ssh/known_hosts
    - export DOCKER_HOST="ssh://ubuntu@${SERVER_HOSTNAME}"
    - *docker-compose-setup
  script:
    - IMAGE_TAG=$CI_COMMIT_SHORT_SHA sh deploy.sh
We define two jobs: one that builds the image and pushes it to a Docker registry, in our case GitLab Container Registry, and one that deploys it to our server. Let's go through both of them in detail.
The build job, as all the other jobs, runs in its own Docker container (on a shared GitLab runner) and uses docker/compose image so that we have docker-compose available. Previously, we only needed a Docker client that connected to the remote Docker daemon on our server. This time, however, we will need a Docker daemon running inside the build container so that we can run docker build and build the image.

In order to be able to run Docker inside another Docker container, we need to enable docker-in-docker service via the services option. After that, we run docker login to log into the GitLab Container Registry using the credentials that are provided to us by GitLab. Finally, we can run docker-compose build to build the images and docker-compose push to push them into the repository.
(If you for some reason don't want to use Docker in Docker, you can use kaniko to build your images. Or you can host your own GitLab runner and use shell executor or use Docker executor and bind-mount /var/run/docker.sock to the container.)
However, in order to make use of Docker layer caching, we first docker pull the latest image so that it can be used as a cache for docker build. We have to tell Docker Compose which image to use as the cache using the cache_from option in docker-compose.prod.yml, otherwise it won't use it and will build it from scratch anyway. Then, we build new images with the latest tag and push them to the repository so that it can be used as a cache during the next build. Finally, we build it with the Git commit hash as the tag and push it to the repo.
When deploying the app, we will use the Git commit hash tag instead of the latest tag. Thanks to that we always know what code is running in production and more importantly are able to do rollbacks using GitLab environments (by specifying the environment using environment option in the .gitlab-ci.yml). If we used the latest tag we would overwrite the previous version of the image and wouldn't be able to roll back to it.
Finally, notice that the deploy job runs only in master. This allows us to build an image for each branch (and possibly test in another stage) but deploy it only after it's merged into master. Alternatively, we can deploy it to a staging environment, if we have any, before merging it to the master.
The last thing is to add all environment variables used in docker-compose.yml (DATABASE_URL, SECRET_KEY and DOMAIN, in our case) to GitLab repo's variables.
Now you can commit it and push it to the repo:
git push origin master
Check whether the pipeline finished successfully and if it did, check the Traefik web UI to see whether your app was successfuly discovered. If everything went fine, you can visit your website 🎉.
Develop
When you want to do some changes to your app/website, you can run docker-compose up to start it locally on port 5000. In docker-compose.override.yml, we tell Flask to run in development mode and mount the source directory so that the code gets reloaded each time we change something.
When we are done doing the changes, we can just commit it and run git push origin master to build and deploy it.
Conclusion
I have been using this architecture for quite some time already and I am using it to host many different apps and am more than happy with it and hope you will be as well. If you have any questions or suggestions, please let me know, I will be happy to help and for any feedback.
If you have any comments, feedback or questions, let me know on Twitter or via email.
Thanks for reading
If you liked the post, subscribe to my newsletter to get new posts in your mailbox! 📬
Also, feel free to buy me a coffee. ☕️
